How I set up a new Mac
November 17, 2021
November 17, 2021
Note: updated March 17, 2023 with Ventura!
As I recently blogged, I just upgraded to macOS Monterey taking it as an opportunity to start from a clean, fresh, pristine system. This means I had to set up everything again, which is not a big deal, but for the sake of remembering it and making it even faster next time, I figured I’d write about it.
This is the kind of blog post that’s mostly for my personal interest, but if you got there somehow, you might take inspiration from my settings, who knows!
But first, let’s ask the following question.
While I could totally have migrated all my data from Big Sur, I like to start from a clean slate every year or two, to get rid of all the unnecessary garbage that accumulated over the years.
Wait, what garbage? Well, let me explain.
Every time you update a software (including the OS), there’s no guarantee that the state you’ll be in after the update would be the same as if you installed the new version directly on a fresh system. Actually, the opposite is pretty much guaranteed.
Most of the time this is not a big deal. Maybe you’re stuck with the
default settings of the version you originally installed instead of
the ones that would otherwise come with the latest version (i.e. Git
always defaults to master and you have to explicitly configure it to
use main, or any small things like this).
Or maybe some commands or tasks might run slightly slower because of
accumulated “bloat” related to things you don’t use anymore and forgot
about (keys, passwords, certificates, trusted IP lists and whatnot
from stuff you connected to once or at least stopped connecting to
ages ago, the list of known Wi-Fi networks and ~/.ssh/known_hosts
being a typical example).
While the above are pretty inoffensive cases, this kind of undefined state drifts might cause more sneaky bugs, and “works on that machine” kind of answers when you try to figure them out.
The same is also true when you uninstall a software; there’s no guarantee that the state you’ll be in after the removal will match the one you would have been in if you didn’t install it in the first place. And again, the opposite is pretty much guaranteed.
NixOS solves some of those issues, but in the real world, you’re likely gonna want to use many programs that are not designed and packaged to be stateless, deterministic, reproducible and purely functional, and using wrappers (or wrapping them yourself) often comes at a tremendous cost in time and convenience.
My tradeoff so far? A fresh reinstall every other year, or whenever I feel like I’ve fucked around enough with that system’s state to be worth a clean start.
Here’s the things I do when I log in the first time on my freshly installed system.
Get rid of all the garbage in the dock. I just leave the Finder and the trash, because you can’t really remove them anyways (did you try dragging the trash to the trash?), but I happen to use them so that’s fine.
Open the terminal app to install Homebrew with whatever is the current recommended way. I Install it in the default place because otherwise it won’t be able to leverage many prebuilt binaries that hardcode the default prefix in them, and it’s utterly slow to compile everything. If you want to run Homebrew on a multi-user system, read that first.
After the installation, Homebrew tells you add eval "$(/opt/homebrew/bin/brew shellenv)" to your ~/.zprofile. I
personally prefer to use my ~/.zshenv for this, because it’s sourced
all the time whereas .zprofile is sourced only for login shells.
Concretely this means that by setting the Homebrew environment
variables in .zshenv, I can do ssh me@my-machine brew ..., whereas with .zprofile, I can’t.
Also I don’t like running eval "$(brew shellenv)" on every single
Zsh boot, I’d rather hardcode the output of brew shellenv in there
since it’s not really supposed to change anyway. Concretely, I run:
/opt/homebrew/bin/brew shellenv >> ~/.zshenv
Install Firefox and iTerm2 and optionally other apps:
brew install firefox iterm2
# brew install rectangle
# brew install homebrew/cask-versions/firefox-developer-edition
# brew install google-chrome
# brew install visual-studio-code
Install DaVinci Resolve.
Install Logic Pro an download the full sound library. Sadly a fresh Logic installation can’t reuse an existing sound library directory (I like to keep mine on my hard drive instead of my limited size SSD), so we need to download the whole 60 GB from scratch.
Press Command + Shift + 5 to open the
custom screenshot interface, where I can change the screenshot
directory to ~/Desktop/Screenshots. I don’t like to clutter my
desktop with screenshots like it’s the case by default.
Now I’m ready to configure the system preferences, iTerm2 preferences and my terminal-environment.
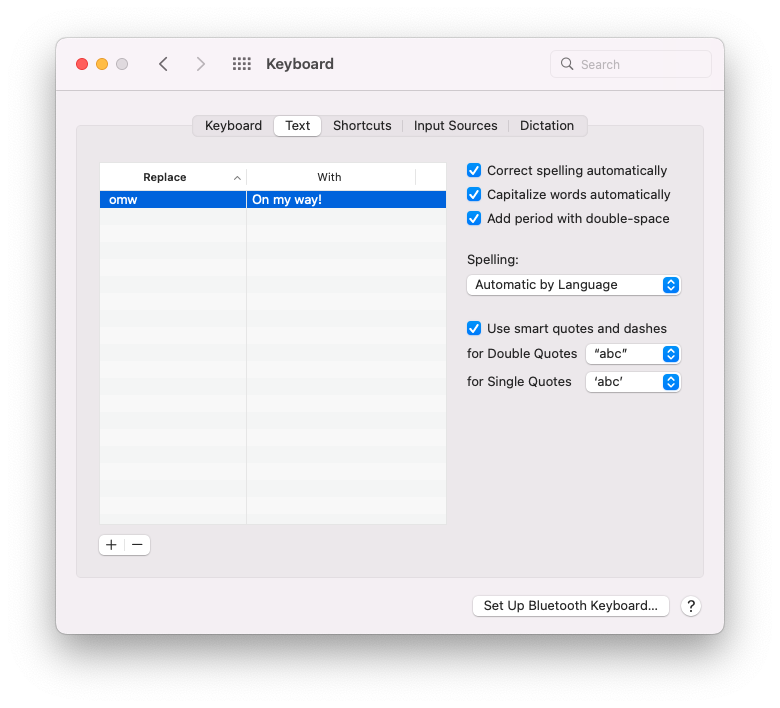
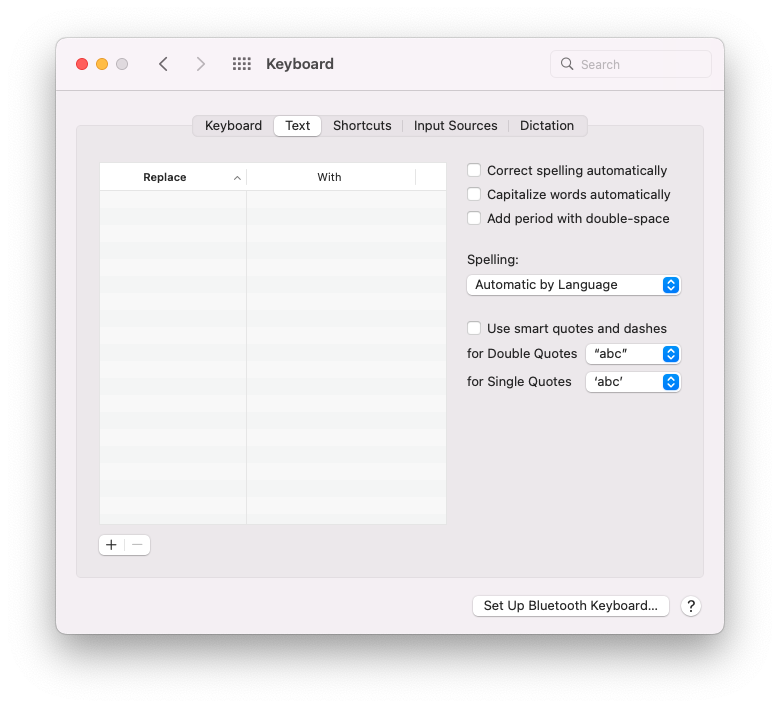
omw abbreviation. See before
and after. I’m always
staggered when I forget to do this and omw gets replaced by On my way!, or when I press space twice and it inserts a colon instead
while I code in Visual Studio Code! 🤦♀️defaults write com.apple.dock autohide-delay -float 0; killall Dock
to remove the delay to
show and hide the dock.For all Visual Studio Code based editors, I disable
ApplePressAndHoldEnabled for… sanity. And I also
force new windows to open as tabs
(this can also be configured system-wide
but I only want it for those apps).
# Visual Studio Code
defaults write com.microsoft.VSCode ApplePressAndHoldEnabled -bool false
defaults write com.microsoft.VSCode AppleWindowTabbingMode -string always

# Cursor
defaults write com.todesktop.230313mzl4w4u92 ApplePressAndHoldEnabled -bool false
defaults write com.todesktop.230313mzl4w4u92 AppleWindowTabbingMode -string always

# Antigravity
defaults write com.google.antigravity ApplePressAndHoldEnabled -bool false
defaults write com.google.antigravity AppleWindowTabbingMode -string always
# Appearance > General > Theme: Minimal
defaults write com.googlecode.iterm2 TabStyleWithAutomaticOption -int 5

# Appearance > Windows: Hide scrollbars
defaults write com.googlecode.iterm2 HideScrollbar -bool true

# Appearance > Tabs: Preserve window size when tab bar shows or hides
defaults write com.googlecode.iterm2 PreserveWindowSizeWhenTabBarVisibilityChanges -bool true

# Appearance > Panes > Show per-pane title bars: off
defaults write com.googlecode.iterm2 ShowPaneTitles -bool false

# Appearance > Dimming > Dimming amount: 10
defaults write com.googlecode.iterm2 SplitPaneDimmingAmount -float 0.1

# Advanced > Mouse: Scroll wheel sends arrow keys when in alternate screen mode
defaults write com.googlecode.iterm2 AlternateMouseScroll -bool true

# Profiles > General > Initial directory: Reuse previous session's directory
/usr/libexec/PlistBuddy -c "Set ':New Bookmarks:0:Custom Directory' Recycle" ~/Library/Preferences/com.googlecode.iterm2.plist

# Profiles > Terminal > Bell: Silence bell
/usr/libexec/PlistBuddy -c "Set ':New Bookmarks:0:Silence Bell' true" ~/Library/Preferences/com.googlecode.iterm2.plist
Note: run this when iTerm2 is not running.
Finally (I couldn’t script this), in Profiles > Keys > Key Bindings, load the Natural Text Editing preset (allow it to remove whatever is already there), and remove Command + Left and Command + Right which otherwise shadow the shortcuts to navigate between tabs.
First, I make a SSH keypair or copy an existing one in ~/.ssh. I
usually run ssh-keygen either way just to let it create the directory
with the proper permissions, even if I’ll override the key later.
ssh-keygen -t ed25519
Clone my dotfiles directory and install my Mac preset (mainly my Zsh, Vim and Git settings).
git clone git@github.com:valeriangalliat/dotfiles.git
cd dotfiles
make mac
cd
Edit my default ~/.zshrc and ~/.zshenv templates and comment or
uncomment some of the stuff there that I may need, mainly enabling my
asdf helper (see below).
vim ~/.zshrc ~/.zshenv
Install whatever software I pretty much always use with Homebrew.
brew install rg fzf imagemagick ffmpeg ncdu htop
Install the asdf plugins I need
and whatever version is in my ~/.tool-versions. My ~/.zshrc
automatically installs asdf on the first invocation so no need to do
that manually.
asdf plugin add nodejs
# asdf plugin add python
# asdf plugin add ruby
# asdf plugin add elixir
# asdf plugin add erlang
asdf install
That’s pretty much the gist! This is a fairly straightforward and not very time consuming checklist, and the main things that need to be automated (my dotfiles) are.
I don’t think it’s worth automating my macOS system preferences somehow as they might change in future versions anyways. Same thing for iTerm2, where I definitely don’t want to copy over my whole configuration file from an old installation, I’d rather start from the latest and greatest defaults and just tweak what I need on top of it.
Everything else is very specific to the current machine I’m setting up and I leave them to my discretion at the time of installing.
If you read until there, I hope that you learnt something, or that it inspired you to document your base setup in a similar way. Cheers!