Google Cloud Functions with a static IP: a guide to high throughput NAT
March 16, 2023
March 16, 2023
One day or another, you’re gonna encounter a firewall with an IP whitelist. It only accepts connections from specific IP addresses that were explicitly allowed.
If you have a cloud, serverless and/or autoscaling infrastructure, new resources are provisioned and deprovisioned automatically to accommodate your load, and public IPs are dynamically allocated when needed. You can’t predict what public IP address are your requests going to be sent from.
This is a problem I’ve needed to solve in virtually every company I’ve worked with in my career.
The solutions may vary depending on the technologies you use, and your load patterns. For example, a simple proxy server (TCP, HTTP or SOCKS, maybe load balanced between a few instances) might go a long way before you need to resort to more complex solutions.
In this blog post I’ll focus on Google Cloud, and in particular Cloud Functions, but you might find it useful if you have the same use case with Cloud Run or Kubernetes, or just need to fine tune a Cloud NAT in general.
Note: this also applies to Firebase Functions, since they’re implemented as Cloud Functions.
If the proxy server approach doesn’t meet your requirements, or you just want a more “cloud native” solution, you’ll need two pieces of infrastructure in order to route your Cloud Functions or Cloud Run containers traffic through static IPs: a VPC connector, and a Cloud NAT.
If you run on Kubernetes, you only need the Cloud NAT.
The VPC connector, also known as Serverless VPC Access connector, is a piece of Google Cloud infrastructure that lets you route the traffic of Cloud Functions and Cloud Run containers to your VPC.
This is useful if you want them to access private resources, or in our case, if you want them to access the internet through static IPs.
The VPC connector is backed by 2 to 10 plain old Compute Engine VMs,
that you can chose from a limited subset of instance sizes (f1-micro,
e2-micro and e2-standard-4). Not far from the naive proxy approach,
but it has to its advantage that those VMs are managed by Google, and
that they have a first-class integration with Cloud Functions and Cloud
Run.
Those instances live in a /28 subnet that you allocate for them on
your VPC. /28 gives you 14 usable addresses
which is sufficient for the 10 instances upper limit.
A few more things to note:
Useful links:
Cloud NAT is the second piece of the puzzle. It allows you to perform network address translation (NAT) on Compute Engine VMs that don’t have an external IP address.
Even though Cloud NAT depends on a Cloud Router, it only uses it for configuring Google Cloud’s networking stack but it’s not involved at the data level: it doesn’t add an extra hop and potential bottleneck in your network topology!
In other words, you can expect an identical network bandwidth and performance with Cloud NAT as if your VMs directly had public IPs, as long as it’s appropriately configured for your situation (more on that later).
Cloud NAT can be configured to dynamically allocate IP addresses as needed, or use a static pool of IP addresses, which is going to be useful for us.
In our case, Cloud NAT works hand in hand with the VPC connector VMs, not only to provide them with internet access, but to do so using static IPs if we configure the NAT that way!
Useful links:
I’ll skim over this part as there’s already decent coverage online:
To add my own contribution, I’ll share a Pulumi example to provision everything you need to get a static IP on your Cloud Functions. It’ll get you in the same place as the tutorials above.
const gcp = require('@pulumi/gcp')

const subnet = new gcp.compute.Subnetwork('subnet', {
  network: 'default',
   // Arbitrary range that doesn't conflict with other subnets in your VPC
  ipCidrRange: '10.8.0.0/28'
})

const router = new gcp.compute.Router('router', {
  network: 'default'
})

const ip1 = new gcp.compute.Address('ip-1', {})
const ip2 = new gcp.compute.Address('ip-2', {})

new gcp.compute.RouterNat('nat', {
  router: router.name,
  region: router.region,

  natIpAllocateOption: 'MANUAL_ONLY',
  natIps: [ip1.selfLink, ip2.selfLink],

  sourceSubnetworkIpRangesToNat: 'LIST_OF_SUBNETWORKS',
  subnetworks: [
    {
      name: subnet.id,
      sourceIpRangesToNats: ['ALL_IP_RANGES']
    }
  ],

  // If not specified, Pulumi enables endpoint-independent mapping by default,
  // even though it's not enabled by default when using the Google Cloud
  // console.
  //
  // To be in the same state as if we used the console, we explicitly
  // have to disable it here.
  enableEndpointIndependentMapping: false

  // More things to go here for optimal performance, see below
})

new gcp.vpcaccess.Connector('connector', {
  name: 'connector',
  subnet: {
    name: subnet.name
  }
})
What this code does:
/28 subnet that is going to be used for the VPC
connector VMs, and that we’ll attach the NAT to.Finally you can configure your Cloud Functions, Firebase Functions or Cloud Run containers to use that VPC connector for all its traffic. In the case of a Firebase Function, it looks like this:
const functions = require('firebase-functions')

functions.runWith({
  vpcConnector: 'connector',
  vpcConnectorEgressSettings: 'ALL_TRAFFIC'
})
  // Your actual function, for example
  .https.onRequest(async (req, res) => {
    response.json(await (await fetch('https://api.ipify.org?format=json')).json())
  })
And ta-da, you get static IPs! 🎉
Everything seems to be working smoothly when you perform basic
connectivity testing (i.e. making a few requests to api.ipify.org),
so you pat yourself on the back “nice, it wasn’t that bad after all” and
you go grab a beer.
Did you think you were done? Wait. We’re just getting started.
So you happily go on and deploy your Cloud NAT and VPC Connector. To your staging environment, obviously, right? Right?

But if you have some kind of traffic, you quickly notice something wrong.
Your Cloud Functions’ execution time is much higher than
usual (up to minutes instead of milliseconds), and as a side effect of
that, your instance count is likely higher than normal. On the VPC
Connector side, everything looks good. But on the Cloud NAT, you notice
a non-zero dropped sent packets rate, with OUT_OF_RESOURCES as a
reason.
Maybe you also have a non-zero dropped received packets rate but that is probably not the concern here (more on that later).
So what is going on? The docs tell us that Cloud NAT is running out of NAT IP addresses or ports.
Note: if you used Pulumi (or Terraform) without explicitly disabling endpoint-independent mapping, you might have accidentally turned on endpoint-independent mapping (EIM), which wouldn’t have been on by default if you used the GCP console.
If you see dropped packets with reason ENDPOINT_INDEPENDENT_CONFLICT,
and you didn’t intend to enable endpoint-independent mapping, this is
your problem here. You probably want to disable it, or even to enable
dynamic port allocation.
In case you do need endpoint-independent mapping, this section of the docs can help you troubleshoot this.
Let’s say you assigned 2 NAT IPs. Each IP gives you 64,512 ports to work with (65,536 minus the 1024 privileged ports). So we’re working with a total of 129,024 ports available for NAT at a time.
If this looks a bit tight for your current traffic and network patterns, there you go, you need to add more IPs.
But if you estimate that is is reasonable (or even way, way enough) for your expected traffic, adding more IPs will likely not solve the problem.
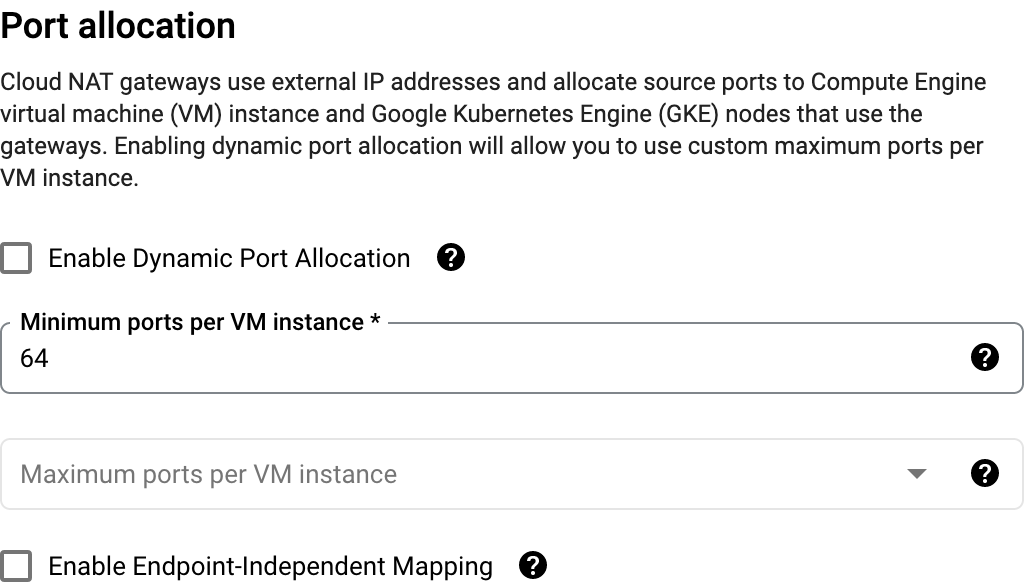
In our case with the default Cloud NAT configuration, it should be in static port allocation mode, aka the state it’s in if you don’t check “dynamic port allocation” in the advanced configurations part (hidden by default).
What this reveals is one key piece of information. Our Cloud NAT defaults to static port allocation with 64 ports per VM.
The copy in this UI is misleading, because while it reads 64 “minimum ports per VM instance”, it is actually both a minimum and a maximum (well, it’s static), which is why the “maximum ports” input is disabled.
So let’s say you configured your VPC Connector to use 2 VMs, this means you’re artificially limiting your NAT to use a most 128 ports used at a time!! (Out of your 129,024 available ports if you have 2 IPs. 😅)
No wonder when all the traffic of your Cloud Functions go through those two poor VPC Connector VMs, you end up seeing huge network latency and dropped packets.
Note: the number you care about here is really the number of VMs you configured on the VPC Connector. You may have a much higher instances count on your Cloud Functions side, but since their traffic has to go through the VPC Connector instances first, it’s really this one that matters.
Once we understand that, the fix becomes obvious: increase the number of ports per VM.
Since in our example we have 2 VPC Connector VMs and 2 IP addresses, assuming we use the Cloud NAT only for those, we could in theory assign up to 65,536 ports (all of an IP’s ports) per VM!
Obviously adjust this number based on the maximum number of VMs you can have relative to how many IPs you allocated.
Realistically, if you want to keep some headroom for adding more VPC Connector VMs without adding more IPs in the future, you need to pick a lower number like 4,096, 8,192, 16,384 or 32,768, especially if that’s enough for your current needs.
The takeaway from is that the default Cloud NAT configuration is really not adapted to be used with a VPC Connector, and we’re required to tune the settings for proper network performance. It’s probably a decent default for other use cases, but definitely not this one.
Increasing the static number of ports per VM should have helped quite a bit with the latency and dropped packets, but we can do better.
If we enable dynamic port allocation, this will allow Cloud NAT to allocate even more ports to a given VM if needed. It can use any number of ports between the min/max range you configure, up to a maximum of 65,536 ports (a full IP).
An important thing to keep in mind with dynamic port allocation is that when a VM uses all its pre-allocated ports and reaches the point where it needs to allocate more more ports dynamically, this is not instantaneous.
The symptoms of that would be, again, dropped packets and increased latency while the ports are being allocated.
In our scenario, this would be very obvious if we used dynamic port allocation with its default minimum ports per VM of 32 (when our load needs orders of magnitude more ports than that).
So we can’t rely solely on dynamic port allocation to save our day. We do still need to configure a sensible minimum ports per VM that matches our expected needs.
Concretely, if we have 2 to 3 VPC Connector VMs, 2 NAT IPs, and the NAT is solely used by the VPC Connector, using a dynamic port allocation with a minimum ports per VM of 16,384 would be a good match that lives us some headroom for adding a few more VMs without needing extra IPs.
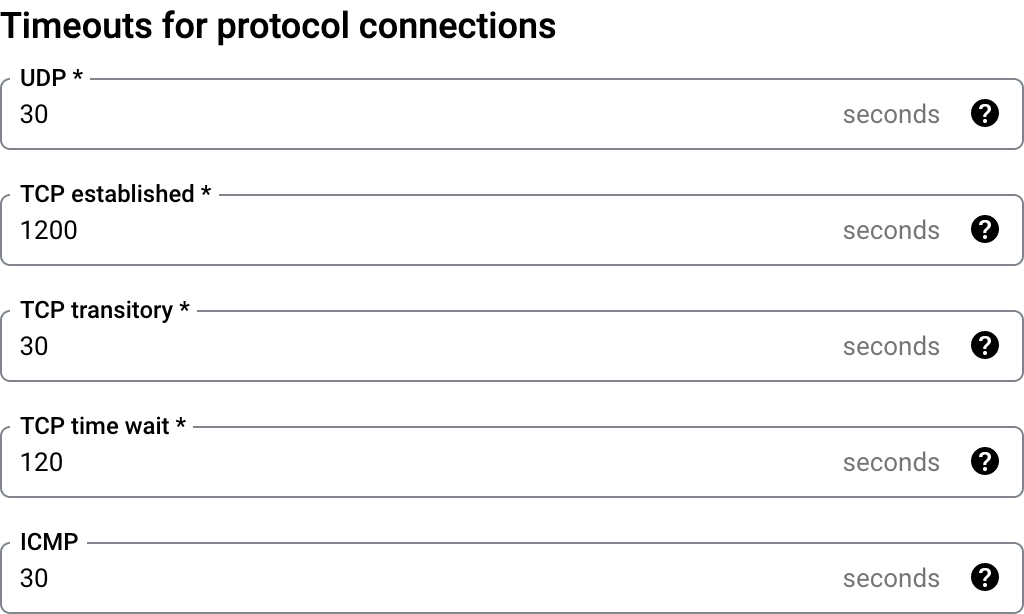
The advanced configurations of Cloud NAT also gives us control over various protocol timeouts. Here are the defaults:
Here we’ll focus on the TCP settings. Here’s a more detailed description of those from the spec:
I’m not too concerned about half-open TCP connections, and keeping them around for 30 seconds sounds like a reasonable value in the first place, so we’ll leave the transitory idle timeout alone.
For established idle timeout and TCP time wait though, respective values of TWENTY MINUTES and 2 minutes may be more problematic.
Those defaults are probably sensible when you have actual VMs directly connecting through the NAT, but with the dynamic and “serverless” nature of Cloud Functions, keeping idle and especially closed connections around for that long is no good.
Matching those with the value of your Cloud Functions request timeout would make more sense, which may be as low as 60 or 30 seconds (or even lower). Once a function gets killed because it exceeded its timeout, there’s no point in keeping the TCP connections it opened (and maybe failed to close) for any longer, especially not 20 minutes!
In my case, lowering those timeouts to 30 seconds had a noticeable difference in the NAT open connections and port usage metric (they got cut by half!).
After learning all this, we can go back to our initial Pulumi example
and apply those optimizations by adding the following to our RouterNat
configuration. Keep in mind this is tuned for 2 (min) to 3 (max) VPC
Connector VMs that are the sole VMs to use a Cloud NAT with 2 static IPs.
Tweak appropriately.
new gcp.compute.RouterNat('nat', {
  // ...

  enableDynamicPortAllocation: true,
  minPortsPerVm: 16384,
  maxPortsPerVm: 65536,
  tcpEstablishedIdleTimeoutSec: 60,
  tcpTimeWaitTimeoutSec: 60
})
After all this, we’re in a pretty good spot for our Cloud Functions to go through Cloud NAT static IPs with optimal performance.
Yet, you might notice that your dropped received packets metric in Cloud NAT is non-zero, and that may concern you.
My advice for you will be to look at the proportion of dropped received packets compared to your total received packets.
While the Cloud NAT metrics tab shows you the dropped received packets
rate, you don’t get the total received packets rate there. You’ll have
to go to GCP metrics explorer and look at received_packets_count.
If your dropped received packets rate is especially low compared to the total received packets you’re processing (e.g. 0.01%), and you notice no negative effects on your app (latency, errors or whatnot), you’re probably fine. After all, those packets are packets that Cloud NAT could not translate, which may include invalid or unauthorized traffic.
However if it’s affecting a non-negligible part of your traffic, and if you’re noticing a high latency or network error rate, you definitely need to address it. This will widely vary based on your specific context and network patterns, but as a blind shot, if you underestimated how long your Cloud Functions can be alive and you lowered the TCP timeouts too much, there’s probably some tuning to be done around there.
If you made it here, congrats! This article was pretty dense, and we covered a number of fairly complex topics. I hope you learnt everything you needed in order to have a successful Cloud NAT configuration for your serverless (or Kubernetes) environment.
If I made mistakes in this post, or if you found something of value that would be worth adding there, as usual, let me know and I’ll be happy to make updates!